Configure dbt with MS Fabric in VS Code with the dbt Power User extension
Lately, I’ve been setting up dbt Cloud to work with Microsoft Fabric. We started out using dbt’s browser-based IDE, but as our number of models grew, I began to miss Visual Studio Code.
First, a quick distinction: dbt Core is the open-source command-line tool for local development, while dbt Cloud is the managed platform that adds features like a hosted IDE, job scheduling, and a data catalog.
Working locally with dbt Core gives you more control. You can tailor your IDE, edit across multiple files, and use extensions to speed up development. dbt Cloud, meanwhile, handles the infrastructure for you and adds extra functionalities for monitoring, documentation, integration with reporting tools and more.
So why not have both?
Develop locally with dbt Core, then deploy and orchestrate in dbt Cloud. The two share the same project structure, though Cloud manages connections and environment variables through its UI, while Core requires local setup. Once configured, they work seamlessly together.
In this post, I’ll give a quick overview of the dbt setup and walk through how to configure dbt Core for local development alongside dbt Cloud.
- 1. Architecture
- 2. Python Configuration
- 3. Clone Your Repository
- 4. Configure the Connection Between dbt-core and Microsoft Fabric
- 5. Visual Studio Code Configuration
- 6. Summary
- 7. What's next?
1. Architecture
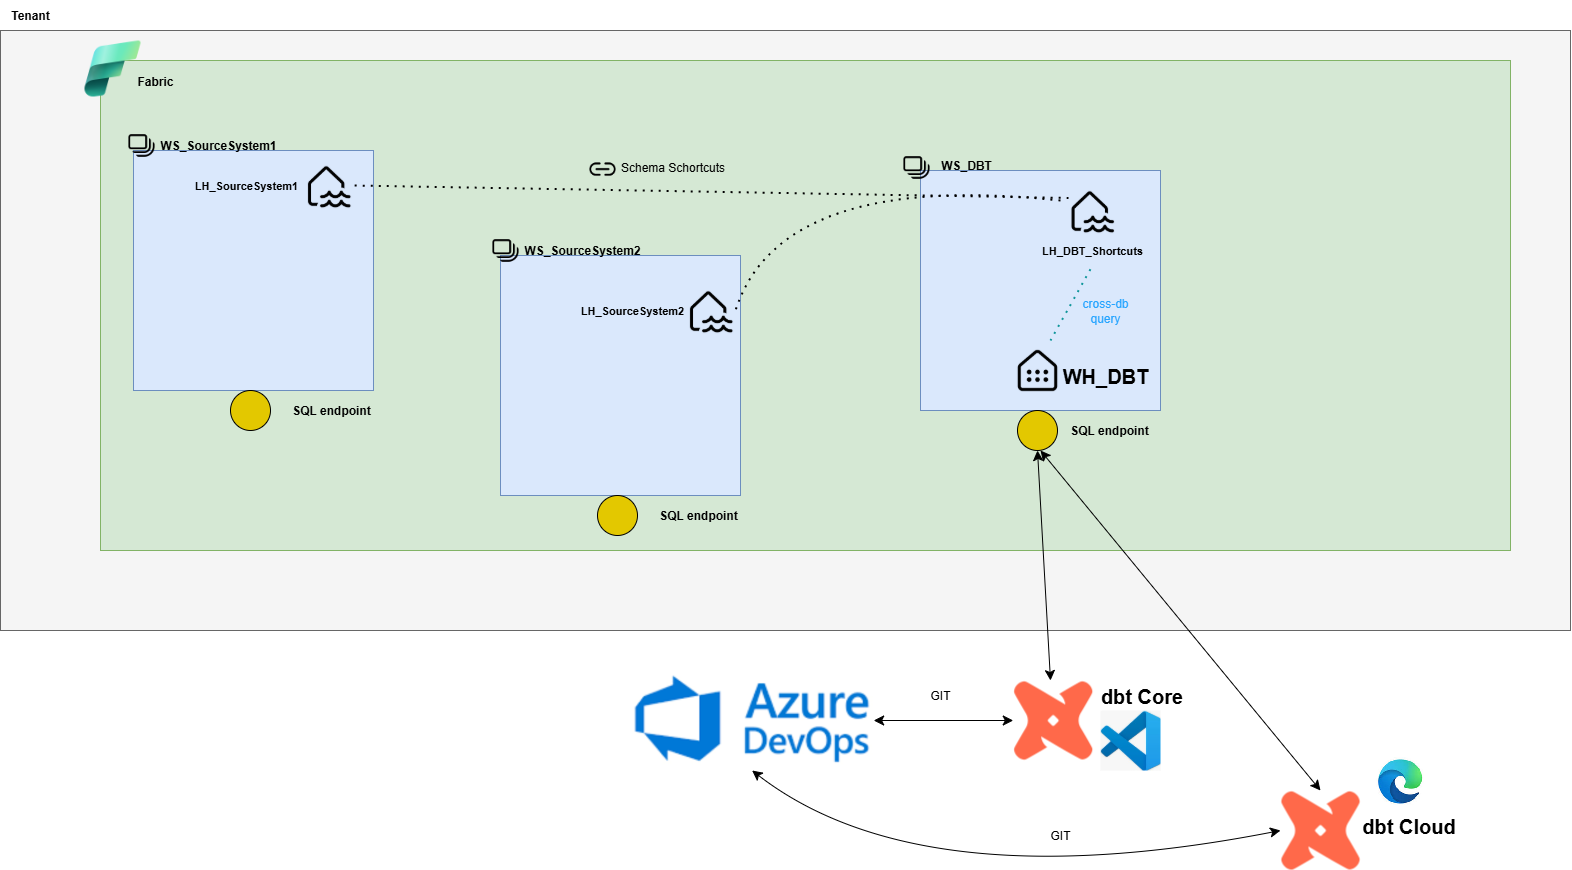
We're using Microsoft Fabric with dbt Cloud.
dbt Cloud connects to the SQL endpoint of the workspace.
Each workspace has one SQL-endpoint. This can be seen as the server-level for the people that are familiar with SQL databases.
Lakehouses and warehouses are the database-level.
All interactions are done with T-SQL to warehouses. Lakehouses are read-only when accessed using the SQL endpoint.
In other words all operations done by dbt should be performed on warehouses within the same workspace.
You can do cross-database queries, but you can't work cross-server.
This means that each environment of a dbt project is linked to a single workspace.
For example WS_DBT_DEV, WS_DBT_QA, WS_DBT_PRD.
You can bring in source data from other workspaces by adding a lakehouse to the WS_DBT_XX workspace.
In this lakehouse you can use schema shortcuts to integrate tables from warehouses/lakehouses in other workspaces.
A schematic representation of this setup is shown below.
You can see that dbt Core and dbt Cloud are connected to the same repository.
So changes made in dbt Core will also be integrated in dbt Cloud.
2. Python Configuration
2.1. Create a Virtual Environment
First, make sure Python is installed on your system. I'm using 3.12.
It’s best practice to use a virtual environment for every Python project to isolate dependencies.
I like to store all my virtual environments in a centralized folder on my C-drive:
C:\venv\
To create a virtual environment named dbt-core-venv, open PowerShell and run:
1python -m venv C:\venv\dbt-core-venv
2.2. Install dbt Packages
Next, activate your virtual environment:
1C:\venv\dbt-core-venv\Scripts\Activate.ps1
Then install dbt Core and the Fabric adapter:
1pip install dbt-core
2pip install dbt-fabric
💡 Tip: You can specify exact versions (e.g.,
pip install dbt-core==1.8.0) to keep environments reproducible.
Once installed, dbt Core is ready to use. Next, we’ll connect it to your Fabric workspace.
3. Clone Your Repository
If your dbt project is stored in Azure DevOps, simply clone the repository directly from DevOps into Visual Studio Code.
1git clone https://dev.azure.com/<your-org>/<your-project>/_git/<your-repo>
4. Configure the Connection Between dbt-core and Microsoft Fabric
dbt connections are defined in a file named profiles.yml, which is usually located in the .dbt folder within your home directory or in your project’s working directory.
On Windows, the default path to the profiles.yml file in the home directory is:
1C:\Users\<your-username>\.dbt\profiles.yml
You can also customize the location of this file if needed. For more details, see the dbt Documentation.
If you’re connecting with a service principal to Fabric, your profile looks like this:
 1default:
 2  target: dev
 3  outputs:
 4    dev:
 5      type: fabric
 6      driver: "ODBC Driver 17 for SQL Server"
 7      server: "***.datawarehouse.fabric.microsoft.com"
 8      database: "***"
 9      schema: "dbo"
10      encrypt: True
11      trust_cert: False
12      authentication: "ActiveDirectoryServicePrincipal"
13      client_id: "***-***-***-***-***"
14      client_secret: "***"
15      tenant_id: "***"
16      threads: 4
💡 The root key (
default) in this yml matches theprofilevalue indbt_project.yml.
You can define multiple profiles inprofiles.ymland switch between them by updating the profile value indbt_project.yml.
➡️ More information about the structure of this file can be found in the dbt documentation.
To check which ODBC drivers are installed on your machine, run:
1Get-OdbcDriver
5. Visual Studio Code Configuration
5.1. Create an .env File
In your dbt project folder, create a file named .env.
This file will store your dbt environment variables.
In my project we used:
-
One to specify different source lakehouses dependening on the environment.
-
One to specify the type of environment (Development/Quality Assurance/Production). We use this for environment specific behavior. For example adding prefixes to the target database names,...
Example .env file:
1DBT_SOURCE_LAKEHOUSE=LH_TestLakehouse
2DBT_ENV_TYPE=DEV
Add .env to your .gitignore file to keep it out of version control.
You can include a template in the project folder with example values so other users can easily do the configuration.
5.2. Create _loadenv.ps1 File
Also create a file named _loadenv.ps1 in your dbt project folder.
This will be used to initialize the environment variables in your VS Code terminals.
 1# Load .env file if it exists
 2$envFile = Join-Path $PSScriptRoot ".env"
 3if (Test-Path $envFile) {
 4    Get-Content $envFile | ForEach-Object {
 5        if ($_ -match '^\s*([^#][^=]*?)\s*=\s*(.*)$') {
 6            $name = $matches[1]
 7            $value = $matches[2]
 8            # Remove surrounding quotes if present
 9            $value = $value -replace '^["'']|["'']$', ''
10            [Environment]::SetEnvironmentVariable($name, $value, 'Process')
11            Write-Host "Loaded: $name" -ForegroundColor Green
12        }
13    }
14}
5.3. Configure VS Code Settings
Now that you have an .env file, let’s ensure VS Code loads these environment variables automatically.
Inside your project’s .vscode folder, create or edit the settings.json file:
 1{
 2    "python.defaultInterpreterPath": "C:/venv/dbt-core-venv/Scripts/python.exe",
 3    "python.envFile": "${workspaceFolder}/.env",
 4    "dbt.enableNewLineagePanel": true,
 5    "terminal.integrated.profiles.windows": {
 6        "PowerShell": {
 7            "source": "PowerShell",
 8            "args": ["-NoExit", "-File", "${workspaceFolder}/_loadenv.ps1"]
 9        }
10    },
11    "terminal.integrated.defaultProfile.windows": "PowerShell",
12    "files.associations": {
13        "*.sql": "jinja-sql",
14        "*.yml": "jinja-yaml"
15    }
16}
This configuration ensures that:
- The correct Python interpreter (from your virtual environment) is always used.
- The environment variables in
.envare automatically loaded. - The new dbt Lineage Panel is enabled by default — which provides a cleaner and more intuitive project overview.
- All sql-files are associated with Jinja-SQL instead of regular SQL. The same goes for the yml-files.
📘 Like your
.envfile, add.vscodeto.gitignoreto keep your local setup out of version control.
5.4. Install the dbt Power User Extension
Finally, install the dbt Power User extension in VS Code.
You can find it in the Extensions Marketplace.
Once installed, you’ll see a dbt panel inside VS Code with build, preview, test, compile, lineage options and so much more.
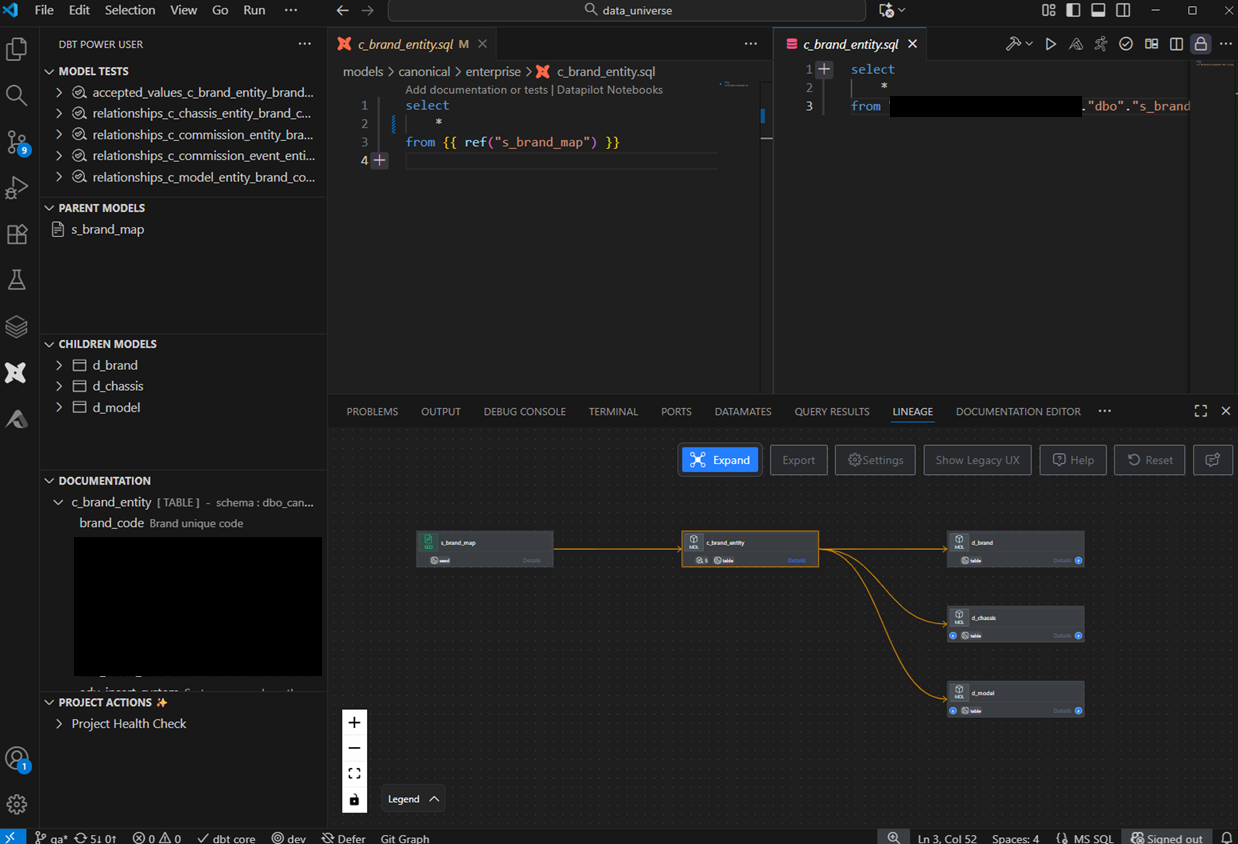
Pretty neat, right?
As a developer, you’ll spend a lot of time in your IDE — so it’s worth making it efficient and enjoyable to use.
6. Summary
You’ve now successfully configured dbt Core to work with Microsoft Fabric using:
- A clean Python virtual environment
- A service principal connection
- Convenient VS Code integration with environment variables
- Which can be used together with dbt Cloud
This setup will give you all the benefits of dbt Cloud with the added freedom and flexibility of local development. 🚀
7. What's next?
Ready to take your dbt Power User extension to the next level?
By registering your Altimate AI Key, you’ll unlock the full suite of AI-powered capabilities.
This includes column-level data lineage, automatic documentation, intelligent test generation, and much more.
These advanced features are designed to supercharge your data development workflow and make maintaining your dbt projects effortless.
👉 Check out the full feature comparison to see everything you gain with Altimate AI.
💡 Get started by registering your key here.
.